Every developer thinks about starting a blog, but the project often dies in the planning phase. We over-engineer, get stuck choosing the “perfect” stack, and never actually ship.
This guide cuts through the noise. We’ll use a hyper-performant, zero-cost stack to get your blog live on a global network in the time it takes to watch an episode of your favorite show.
Table of contents
Open Table of contents
The Stack
This stack is chosen for speed, simplicity, and cost (free).
- Astro - For its incredible performance and focus on shipping content, not heavy JavaScript. It’s the modern alternative to sluggish frameworks.
- AstroPaper - A clean, feature-rich theme that handles SEO, dark mode, and tags out of the box, so you don’t have to.
- Cloudflare Workers - Instead of typical static hosting, we’ll deploy to the edge. This means your site is served from data centers all over the world, making it ridiculously fast for every visitor at no cost.
- GitHub - The industry standard for version control and the engine for our CI/CD pipeline.
Get Your Blog Code
Fork or clone AstroPaper:
git clone https://github.com/satnaing/astro-paper.git my-blog
cd my-blog
npm install
Make It Yours
Edit src/config.ts:
export const SITE = {
  website: "https://yourdomain.com/",
  author: "Your Name",
  title: "Your Blog Title",
  description: "What you write about",
};
Push it to your GitHub repo.
Deploy with Cloudflare Workers
We’re using a modern approach: deploying our static site directly as a Cloudflare Worker for maximum performance. Here’s the actual deployment flow:
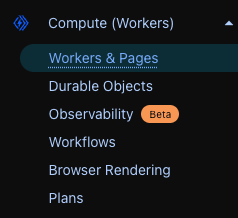
1. Access Cloudflare Dashboard
Log into Cloudflare and navigate to Workers & Pages from the sidebar:
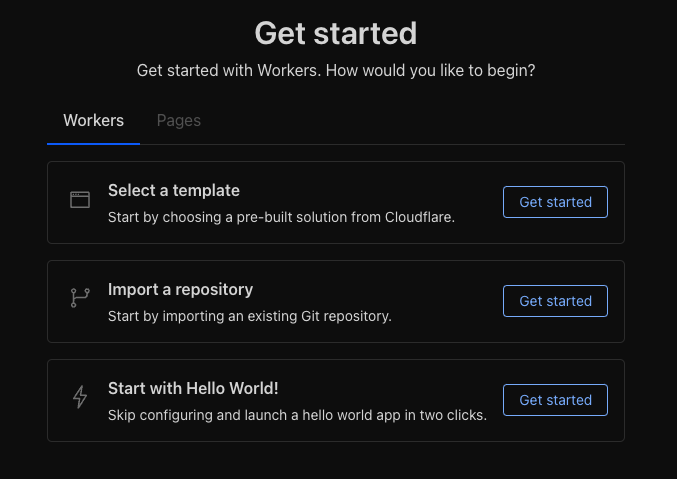
2. Get Started with Workers
On the Workers & Pages page, you’ll see the “Get started” screen. Click Get started next to “Import a repository”:
3. Select Your Repository
You’ll see the repository selection screen:

- Select your GitHub account from the dropdown
- Find and click on your blog repository
- Grant necessary permissions if prompted
4. Configure Build Settings
After selecting your repository, you’ll see the build configuration form:
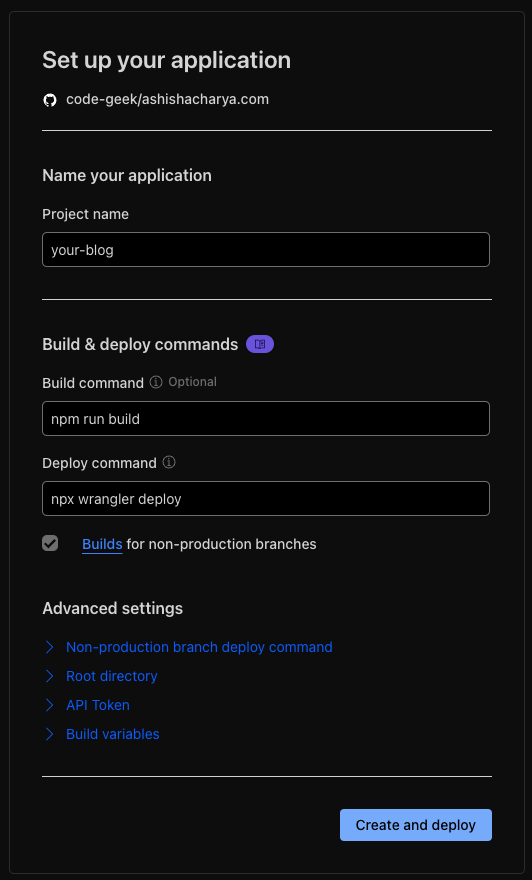
Fill in these settings:
- Project name:
your-blog(this becomes your subdomain) - Build command:
npm run build - Deploy command:
npx wrangler deploy(this should already have been filled out)
5. Deploy
Click Save and Deploy. Cloudflare will:
- Clone your repository
- Install dependencies (including Wrangler)
- Run your build command
- Use Wrangler to deploy your static assets as a Worker
Your first deployment takes ~2-3 minutes.
Add wrangler.json
Finally, we need to tell Wrangler (Cloudflare’s command-line tool) where our built site is. Create wrangler.json in your project root:
{
  "name": "your-blog-name",
  "compatibility_date": "2025-08-03",
  "assets": {
    "directory": "./dist"
  }
}
Push to GitHub. Cloudflare will auto-deploy using Wrangler.
Fix Build Errors
If deployment fails:
- Check the build logs in Cloudflare dashboard
- Common fix: Make sure all dependencies are in
package.json - Push fixes, Cloudflare rebuilds automatically
Custom Domain
To add a custom domain to your Worker:
- Go to your Worker’s dashboard and click on Settings tab
- Find the Domains & Routes section
- Click + Add next to Custom domain
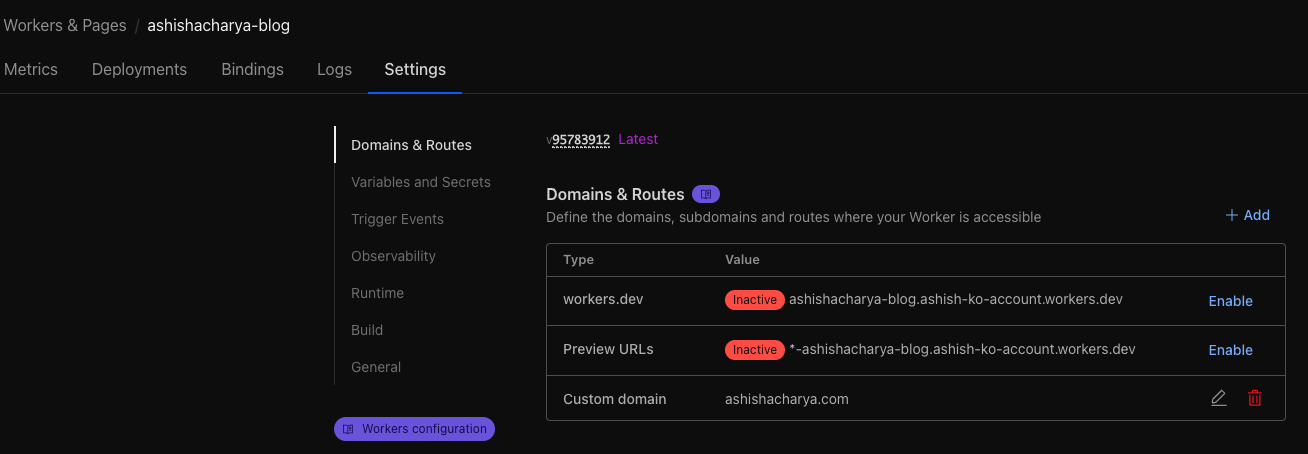
- Enter your domain name (e.g.,
ashishacharya.com) - Follow the DNS configuration instructions
- Wait for DNS propagation (usually takes a few minutes)
Your blog will be accessible at both:
your-blog.workers.dev(default; you can disable this if you want)yourdomain.com(custom)
What’s Next?
- Write posts in
src/data/blog/ - Push to GitHub → Auto deploys
- Your blog is at
yourdomain.com
That’s it. You have a blog. Now go write something.